AMATEUR RADIO AND MY RF SHIELDED RASPBERRY SHAKE VAULT EXPERIMENT
August 24, 2020 – Written by Andy Hansis
Twitter: @AndyHansis
ABOUT ME

Andy Hansis is a Broadcast and Land Mobile Radio engineer with over 45 years in the industry. Furthermore, an amateur radio operator, Wilderness and Urban Search & Rescue Technician, and an enthusiastic amateur seismologist.
FROM RADIO WAVES TO SEISMIC WAVES
Amateur radio, or ham radio as it is often referred to, is a hobby of waves. Electromagnetic waves of radio frequency emissions to be exact, and how they propagate through the atmosphere, objects, and the Earth. For those that enjoy the challenges of talking on the radio or sending data around the world often a great deal of time can be spent learning about earth, solar, and atmospheric sciences that affect the propagation of our transmitted signals. There are a lot of parallels to seismology and how mechanical waves propagate through the Earth. Ham radio operators, or hams, are known to be experimenters and tinkerers often playing with the latest gadget or building a project (Figure 1). The Raspberry Shake seismometer fits right into that tinkering and learning mold. It opens up a new world of waves and propagation to study and a new tech gadget to tinker with. The Raspberry Pi single board computer that is the heart of the Shake is often something hams tinker with, finding interesting things to do with them is frustrating and fun all at the same time.

Figure 1 – Amateur Radio Setup
Ham radio enthusiasts also tend to be involved with providing emergency services to our community and like to have situational awareness of events happening in the world around them. Here in California earthquakes are one of those concerns and the Raspberry Shake seismometer helps provide that “ear to the ground” that something is happening in real-time. Personally, I have always been interested in earthquakes and followed them using USGS and other resources, all the while trying to learn the science behind them and seismology. In the past I have been a part of the Quake Catcher Network, a UC Riverside project, using a MEMS Accelerometer and BIONC for sending real time data. I enjoyed watching the visualization of the MEM data as well. When I found the Raspberry Shake it was a must have for me and it would again allow me to send data for bigger research via the AM ShakeNet.
TOO MUCH NOISE!
As a ham my location is challenged by RF noise from my radios. I found the Raspberry Shake seismometer to be VERY sensitive to Radio-Frequency (RF) interference. Even my 900 MHz low power transceiver for my weather station was enough to cause spikes 40 feet away from the Shake when it was in the house! Needless to say, keying up an HF radio at 500 watts makes a rather large impact on the data.
Being in a small urban lot there was no good way to separate the Shake from the antennas with very much distance and I wanted to get the Shake out of the house to lower the urban noise from life a bit. I am also 60 feet from a four lane arterial roadway with cars and heavy trucks going by at 40 mph. I knew the traffic noise would not help at all.
It was time to take action and try to isolate my Shake from all this noise by building a vault!
VAULT PLANNING
I picked out a spot in an unused raised garden bed that is 5×5’ and about one foot above the grade to be the spot to place the Raspberry Shake seismometer. It is out of the way of foot traffic and I figured that the extra foot would help with the possibility of moisture intrusion in the event of puddling rainfall. I knew that here in the Central Valley of California any hint of bedrock is several hundred feet below the ground so did not even consider any sort of borehole. Just a small hole a foot or so below the vault, in contact with compacted earth, would suffice.
Next came the question of how would I accomplish full RF shielding?
I could pour concrete walls with grounded screening in it but that would be a pain to construct. Then it hit me, how about a galvanized steel garbage can? They are outdoor rated, water tight, have a decent fitting lid, and are reasonably cheap.
So off to the hardware store I went and picked up a shiny new 40-gallon galvanized steel garbage can. This would work perfectly as an RF tight enclosure and also keep the water out with just a little silicon sealant on the rolled seams and perforations for the handles.
While I was there, I picked up a half dozen cans of Great Stuff foam and some 60-pound bags of ready-mix concrete.
CONSTRUCTION BEGINS
I dug a hole about four inches larger than the diameter of the can and about eight inches deeper than the can is high. I flared the bottom of the hole out about six inches at the bottom to provide a foundation of sorts and made about a foot deep, six inch bore hole in the center to provide horizontal stability in the soil.
I mixed up the concrete and poured it into the hole until it was above the level where the bottom of the can would be with about four inches of the top above grade. Next, I punched a dozen or so 1-inch holes in the bottom of the can and then plunged it down into the concrete. I shook and wiggled the can to get all of the air out of the bottom indentation and moved it down to the depth I wanted the can to be.
Now the can was in the hole with the top about four inches above the ground. Next, I poured about 1/3 of the can full of concrete and then the remainder I poured around the can to fill some of the void in the walls of the hole up to about half way up the can. At this point I had about 120 pounds of concrete in the can and hole. I leveled the top of the can (Figure 2) and continued checking the level a few times early in the process to ensure it stayed where I wanted it. Now it was time to wait 24 hours for the concrete to set.

Figure 2 – Construction of Seismic Vault
TROUBLESHOOTING!
I put the lid on the can overnight 2 days later and the next morning the vault for the Raspberry Shake seismometer was covered in condensation… This was bad!
The concrete is wicking moisture both from the set process and from the ground around it via those holes I punched in the bottom to bond it all together. “How do I solve this problem?” I asked myself. I needed a way to seal the concrete to keep the moisture out, this was supposed to be water tight after all.
Trip number two to the hardware store… I looked at all sorts of concrete seal stuff at the store. Most of it did not want to be applied for 28 days. 28 DAYS!!! Who has that kind of time, I want it all and I want it NOW! Then I spotted it, Envirotex Lite Epoxy Resin Coating. This stuff cures to a hard surface and is impervious to water, it would be a perfect seal poured into the can and even bond to the can surface. An impenetrable vapor barrier to seal the concrete.
I picked up the 16 ounce kit figuring it would put about a 1/8 inch thick layer on the bottom of the can. I mixed it up per the instructions and poured it on the bottom of the can. It spread out and completely covered as expected, and get this, it is self-leveling… Perfect!
The temperature was dropping fast as the sun went down and I needed to keep the temperature up for a proper cure so I hung a 100 watt spot bulb in the center of the can and covered it with a tarp overnight figuring it would keep it 90 to 100 Fahrenheit in the can. The next morning the resin was cured nice and hard and is now a perfect moisture barrier. Next, I used silicon sealant on any remaining seams in the can and the punctures for the handles. I put the lid on the can overnight and the next morning it was all bone dry. Success!
POWER & CONNECTIONS
Now to get the power and Ethernet in the can. I punctured a hole in the side of the can and ran the cables through. Then I used copious amounts of silicon sealant to seal up the hole and hold the cables. To help keep RF out of the can I used ferrite cores with a few turns of each cable on them right at the entry hole and then buried them slightly below the dirt.
For the Ethernet back-haul I chose a TP-Link CPE210 configured in client mode and placed it on a pipe several feet away from the hole pointed at the house. The POE injector was placed in the can and attached to the CAT5 exiting the can. The CAT5 to the Raspberry Shake seismometer was choked with another ferrite core to hopefully do away any stray RF just before it went in the Raspberry Shake LAN jack. The power to the Raspberry Shake was also given a ferrite core right at the Shake. See Figure 3.

Figure 3 – Seismograph Vault Power
FINISHING TOUCHES
The last step was to foam up the inside of the lid for insulation as well as the inside of the tub I used for the overall outer cover. I backfilled the remaining hole with dirt and tamped it down a little. I built a bit of a mound to redirect any water away from the can opening leaving just enough of the top metal exposed to put the lid on the can.


Figure 4 – Finished Vault, with Cover
So now the Raspberry Shake went in the hole, adjusted the level screws, and we powered it all up. I put the lid on the can and the tub over that (Figure 4).
PUTTING IT TO THE TEST
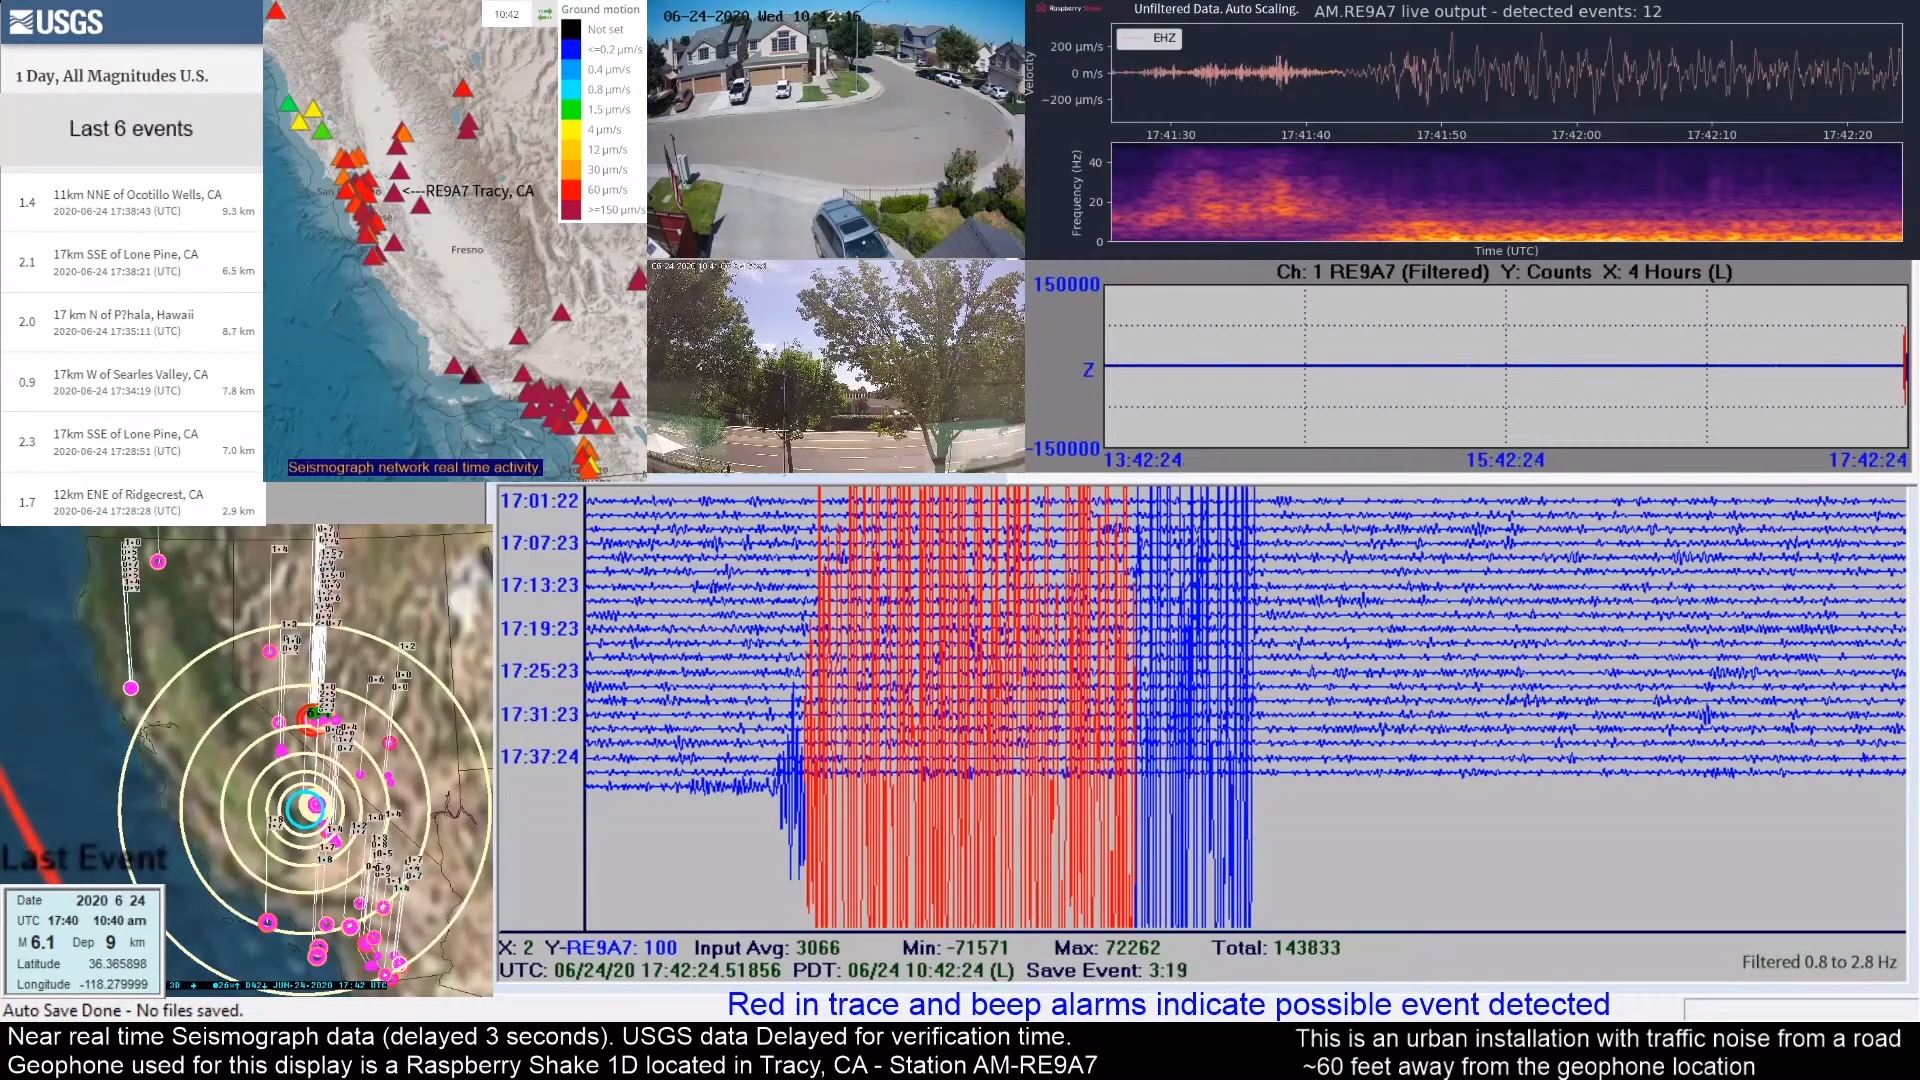
So far it looked like everything was going according to plan. The Raspberry Shake seismometer was reporting well and sensitivity seemed good or better than when it was in the house. No more noise from washing machines and the like!
Now for the big test, the radios. I went band by band testing using a CW carrier… 2m at 100 watts, 6m at 200 watts, 10m at 500 watts, 20m at 500 watts, 40m at 500 watts, 80m at 500 watts… so far not a hint of RFI in the data. On 160m I did see RFI even at 100 watts but I was more than happy with that for now.
CONCLUSION
Overall, this experiment is a complete success and meets my needs. Continued checking of the can I find it bone dry in the morning but I will still be adding a desiccant pack just to be safe and continue to monitor it. I am sure more tweaks are going to present themselves and I will continue to find innovative ways to resolve them.
As seismic events unfold in Nevada and Central California I continue to be impressed with the sensitivity of the Raspberry Shake seismometer and will say it is much less noisy than in the house.
73 de K7FED and the AM-RE9A7 Raspberry Shake 1D in Tracy California.
You can watch the RE9A7 Raspberry Shake station live-streaming on YouTube by clicking the image below:
At Raspberry Shake we would like to say a huge thank you to Andy Hansis for sharing details of his fantastic project and look forward to updates of the events you record.